Monday, September 24, 2012

Today's In-Class Activity


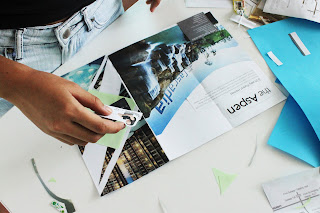
 Audrey and I paired up. K joined us in the mid of designing the brochure. Audrey did  most of the pastings, and my duty was finding and cutting out related pictures according to the topic chosen. K's job was searching body contents that fit to 1 page of the brochure.

 Placement of pictures and information is important.
 Audrey.

 Me - cutting topic-related pictures.


 Good colors and placement.


 Cute Brochure by Evelyn and Ashley.


During our presentation, we explained the design of the brochure in terms of colors and method of making it. We decided on the topic high living lifestyle and homes. The color, light green that we chose was based on the mostly-blue images which matches perfectly. It also gives a relaxing feel of the overall look.

We pasted a diamond cutout shape behind the title, so that it looks obvious enough as a title. The background image of the title was cutout this way to give a unique and professional look.
The title and front page of our brochure.


 Content inside the brochure.
For the twin towers image, I used my art knife to cut it curve so it wouldn't turn out plain besides, it looks more interesting and pleasing to the eye this way. Which is also because of the influence of Harmony and Rhythm from the curves.

Audrey then cut the top of the bottom image curve that creates radical balance for the whole content design.

The triangles on the page at the right end, I sliced vertical lines divided by my steel ruler ,on a light green paper, then intersecting them by slicing rows of horizontal line to create squares with the same length. I then used my scissors to cut them into half to create a these triangles.
With the placement of triangles, the overall looks seems more attractive with the plain text that K has cut out. These 3 pages gives a unified and balanced design.

We added light green borders on the far right and left for the widespread of the brochure so the brochure looks more 'complete' and professional. The borders gave the whole brochure a neater look too.
 For the back of the brochure, we also used large images. The word "Cascadia" was placed perfectly following with the whole image because the folding line as you can see, does not touch the name. The text and the names were somehow placed strategically with the rule of thirds. However, I think our craftsmanship could be better because the text title, "Aspen" has crooked cutout lines.


 Widespread of back of brochure.

Audrey, K and I were happy and satisfied with our in-class activity today. We felt a sense of achievement that completed our day.

After our in-class activity, we had tutorials for Assignment 5. I have almost completed my Assignment 5 and pictures and progress will be posted up soon after the presentation. I decided to show my progress of my work through pictures that I have taken ,which I'll also be compiling all of them into a video for Assignment 5 presentation tmrw.

I hope everything goes smoothly tmrw :)


Saturday, September 22, 2012

Progress - Assignment 5


Research - Assignment 5

We are assigned to create 4 papercuts by following the principles and elements of design.

1. Balance and symmetrical x2
2. Dominance, weight and space x2


And so I've done some researches about these princinples and papercuts/papercutting. I also found out that papercutting is also called Scherenschnitte.

"The task of artists is to organize elements into a comprehensible whole by simplifying, organzing and unifying." - Kenneth Bates
"Principles of Design

The principles of design are the rules by which an artist uses the elements of design.
The most often used principles in visual art are: balance, emphasis, movement, variety, proportion and unity. These principles may vary slightly according to the person using them.

7. Balance
Balance is the arrangement of lines, colors, values, textures, forms, and space. there are three types of balance: formal or symmetrical or informal or asymmetrical and radial balance. Formal or symmetrical balance has equal weight on both sides. Informal or asymmetrical balance has a different weight on on each side to maintain balance. Radial balance is a circular balance moving out from a central object to maintain balance.


8. Emphasis
Emphasis is way of bring a dominance and subordination into a design or painting. Major objects, shapes, or colors may dominate a picture by taking up more space or by being heavier in volume or by being darker in color than the subordinate objects, shapes and colors. There must be balance between the dominant and subordinate elements.

9. Movement
The use of lines, colors, values, textures, forms and space to carry or direct the eye of the viewer from one part of the design or picture to other is called movement. Movement is created in art by the way the artist uses the elements of design. Movement is generally created by the arrangement of shapes.

10. Variety and contrast
An artist uses elements of art to create diversity and differences in design. Contrasting colors, textures, and patterns all add interest to the art work. Highlights of color to the corners or edges of some shapes maybe used to add contrast.

11. Proportion
The size of one part of artwork to its other parts is called proportion. Artists use proportion to show emphasis, distance and use of space, and balance.


12. Unity
Unity is the result of how all element and principles work together. All parts must have some relation to each other. They must fit together to create the over all message and effect. "
- adapted from: http://www.ursyn.com/Orchestra/pages/Toby.html


More papercutting websites:
http://www.maudvantours.com/selfridges/
http://papercutting.blogspot.com/

Scherenschnitte


So skillful


3D flower


From a plain piece of white paper


"Papercutting is the art of cutting paper designs. The art has evolved uniquely all over the world to adopt to different cultural styles.

History

The oldest surviving paper cut out is a symmetrical circle from the 6th century found in Xinjiang China.[1] By the eighth or ninth century papercutting appeared in West Asia and in Turkey in the 16th century. Within a century, papercutting was being done in most of middle Europe." - wiki


How to apply dominance, weight and space into you design?

"What is Dominance?

dominant (adj) – commanding, controlling, or prevailing over all others
dominance (n) – the fact or state of being dominant
Given the definitions above it shouldn’t be too hard to understand dominance as a design component. When you create dominance in your work you are creating elements that command attention and prevail over other elements.
Every design should have a primary area of interest or focal point that serves as a way into the design. From the primary dominant element, design flow can be achieved by creating elements with secondary and tertiary dominance.
Dominance relies on contrast, since without contrast everything would be the same. You might even think of dominance as contrast in extreme, though it doesn’t have to be.
Consider 2 squares of different sizes. The larger square will likely dominate (even if it’s only slightly larger) and the greater the difference in size between the 2 squares the more the larger will dominate the smaller.
dominance-size.png
In the image on the left the larger square dominates the smaller square, though not to the extent that the larger square in the image to the right dominates its smaller sibling.
Dominance is the varying degree of emphasis in your design elements. You can create 3 levels of dominance in your work.
  1. Dominant: The element given the most visual weight, the element of primary emphasis. The dominant element will advance into the foreground in your composition.
  2. Sub-Dominant: The element(s) of secondary emphasis that will become the middle ground in your composition.
  3. Subordinate: The elements with tertiary emphasis, given the least visual weight. Subordinate elements will recede into the background of your composition.
It becomes difficult to create a 4th level of dominance. As human beings we can easily distinguish most and least, but things in between quickly move into a gray area where they are seen as equal in dominance.

Why is Dominance Important?

As I mentioned above dominance helps create an area of interest, a focal point or starting point in your design. The dominant element on your page should be the element you want people to see first. Perhaps it’s your logo or the title of the page or whatever else you want people to notice first.
Dominance creates a visual hierarchy in your design. A hierarchy is by default a series of different levels of dominance.
A lack of dominance between elements leads to competition between them. If there are two red circles of equal size in your design, which should I look at first? Different people will choose different circles and some will bounce back and forth between both. Had one circle clearly been dominant your viewer knows to look at it before the other circle.
Without a dominant element on the page your readers must work to find their own entry point into your design. That’s not as easy as it seems and the least amount of work may be moving on to another design on another page on another site. Remember, “Don’t make me think.” Instead make it easy to find a way into your design.
By creating a dominant element in your work you reveal what’s most important in your design and show people were to look first. From there you can create a subdominant element to guide your viewer where to look next.

How to Create Dominance in Your Design

As a general rule the elements in your design with the most visual weight will be the most dominant. However that may not always be the case.
At times the dominant element may be the element that most dominates its immediate surroundings. An object surrounded by whitespace dominates its immediate environment.
dominance-local.png
In the image above your eye probably falls first on the circle in the center. It’s hardly the largest shape in the image and doesn’t carry the most visual weight. However because it’s completely surrounded by whitespace it dominates its local environment. The shapes with more visual weight tend to blend together here and none dominates its immediate space.
In general though, more visual weight = more dominance in the element
You can add more visual weight to elements through
  • Size – As you would expect larger elements carry more weight
  • Color – It’s not fully understood why, but some colors are perceived as weighing more than others. Red seems to be heaviest while yellow seems to be lightest.
  • Density – Packing more elements into a given space, gives more weight to that space.
  • Value – A darker object will have more weight than a lighter object.
  • Whitespace – Positive space weighs more than negative space or whitespace.
Keep in mind that visual weight is a combination of all of the above. Your biggest element on the page may also have the lightest color and value and still recede into the background.
Be careful with overdoing dominance. While you want to create an element that dominates your design to serve as the focal point you still want the rest of your design to be seen. Be careful not to make an element so dominant that everything else in the design gets lost. You want your design to be balanced overall.
You can create dominance in elements that don’t have the most visual weight. Objects placed in the center are often seen as a focal point as long as their is enough emphasis given to them. When many other elements all lead your eye to one particular element, that element can become the dominant focal point.
On the web every element is a box. Like it or not when you develop a page you are creating boxes and while there are ways to make things appear less rectangular visually, it’s common to have most of your elements in one box or another. As a result circles gain increased dominance since they contrast with the straight edges of rectangles.
And again consider the image above. The small circle dominates the surrounding whitespace. It may be too small to dominate on its own, but it dominates its immediate environment." -adapted from http://www.vanseodesign.com/web-design/dominance/

"In the below example, the trees act as the dominant element, the house and hills as the secondary element, and the mountains as the tertiary element.


"SYMMETRY
Symmetry means a mirror image -- one side is the mirror image of the other. Symmetry can occur in any orientation as long as the image is the same on either side of the central axis.

This type of image has great appeal -- it makes for "good" shape relationship. Many people automatically gravitate to symmetry. We are symmetrical after all -- two eyes, two ears, etc.. Look around at consumer products and graphics (printed materials) to see how many use symmetry. You will find that it is the dominant organizational concept." -adapted from http://daphne.palomar.edu/design/bsymm.html

Grid Redo


I have redone my Assignment 4 :)
to view them, please click: https://docs.google.com/viewer?a=v&pid=forums&srcid=MTM3OTU2MjMwNzMzNTQ5OTc3MjYBMDE3MDk0NjMxNDUxODMwNDg3NDABVE9EWG53RkJ4bE1KATQBAXYy Thank you! I personally think this redo is way better than the previous ones I've done.

Besides clicking the link, I had screenshot the documents and here they are:

Baseline:


Columns:


 Golden Ratio:


Assignment 4

These are my submitted works for Assignment 4 - Grids. It's kinda messy so I'm gonna redo this assignment.


Tuesday, September 18, 2012

PRESENTATION - ASSIGNMENT 4

Greetings :)
Today's PoD class, I presented my Assignment 4 (Columns, Baselines and Golden Ratio). I did 2 versions for each type of template design. During my presentation, I pointed out the Header, Sub-header and the placement of baselines, columns and the golden ratio. I'm happy with the width of the gutter for every layout but the margins for the Baseline layout could've been done clearer. Color wise, I personally think I've made quite a wrong choice for the content color because black fonts are easier to be read. 
I've done my work with Microsoft Word and printed them using the campus's printing machine at Block B. A big regret I had, not converting them to pdf files. Because the fonts and alignments turned out not what I wanted ): Bought mounting boards before going to the print shop actually, and pasted 2 of different printed articles onto a 20x30 mounting board, a total of 3 mounting boards for 6 printed articles. 3 mounting boards = RM15.
Microsoft Word has made my work much easier by providing the column system. And I also got too fancy over the pictures I've placed on the articles because I can't resist myself from adding styles on them like drop shadow/rounded corners/reflection etc >< I discovered a really cool font, ORATOR STD. It's applied to one of the articles. I'll update this blog with another post regarding how I've done my article, well, once I get home to use my computer. I'm currently in this cold, cold MacLab in the library. So please, stay tuned!
Overall, I'm pretty upset and unsatisfied with my work this time because #1, I should've started earlier although I started doing it on Saturday. But I should start doing on the day that the assignment. That way, more time is spent therefore more enhancements can be made. Because the more time you invest on an assignment, the better outcome you will achieve. #2, I was too overambitious over it. I'm sure everyone wants an A++ for their assignment, and for me, I overdid this assignment. I placed too may pictures for an article, made it too colorful, although I'd really like it to look aesthetic. But doing it this way, creates a blur line between reaching the goal of showing how much I understand what Columns, Baselines and Golden Ratio mean. Though, I truly understand how it works but overdoing it by making it look "not simple", doesn't clearly show the aim of this assignment. #3, I should always keep things simple and break my habit of adding unnecessary and extra things and also focus onto the right path!
I hope I've learnt my lesson this time.  And I also wish to get better grades the next time (~',')~ * ~('.'~) And well well, good news! We are given a second chance which I'm really happy about it - to redo your work! And I'll definitely make them simpler and less colorful this time. I should also be aware of the types of color I choose :) 


Sunday, September 16, 2012

Guide to Designing your Grid

  1. Sketch GRID TEMPLATE (16 modules) onto A4 paper
    - fold paper into 4, vertically and horizontally.
  2. For an easy-read-column, average of 10 words per line.
  3. GUTTERS (the division between columns), wider than 3mm.
  4. Decide placement of HEADING (doesn't matter that it runs across as many columns)
  5. Decide placement of SUB-HEADING
  6. Choose FONT
  7. Choose FACE

In-class Activity 2 of Lecture 5 (11/9/12)

"Now, on a plain piece of paper roughly sketch your own grid work
  •  1. Lengthy magazine article
     2. Poster


Indicate placement of
HEADER,
SUB-HEADER,
IMAGE(S),
CALL OUT,
BODY COPY.
"